Contents
Evaluating the extent of water damage, identifying hidden moisture sources, and utilizing moisture meters are essential steps in post-water damage inspection. Each method offers unique insights into the situation, helping you understand the severity of the problem. Without a systematic approach, vital details can slip through the cracks, leading to further complications. To ensure a thorough inspection, you’ll need to take into account additional techniques that enhance your evaluation and restoration efforts.
Key Takeaways
- Conduct thorough visual inspections to identify discoloration, peeling surfaces, and structural issues indicating water damage.
- Utilize moisture meters to detect hidden moisture levels and identify potential mold hotspots effectively.
- Inspect plumbing areas, appliances, and structural components for hidden leaks and moisture intrusion sources.
- Document findings systematically, including damage severity and estimated costs, to support claims and recovery efforts.
- Engage qualified professionals for air quality testing and remediation to ensure a safe environment post-damage.
Assessing the Extent of Water Damage
When evaluating the extent of water damage, it’s vital to start with a thorough visual inspection of the affected area. Look for discoloration on walls, ceilings, and floors, as these indicate moisture infiltration. Pay attention to peeling paint or wallpaper, which can signal underlying issues. Check for warped or buckled surfaces, as these may compromise the area’s structural integrity.
Next, assess any materials that may have absorbed water, such as drywall or insulation. These can harbor mold and bacteria, posing further risks.
Document your findings systematically, noting the severity and location of the damage. Maintain a clear record of any structural concerns you discover, as this information is important for remediation efforts.
Identifying Hidden Moisture Sources
Although water damage may be visible, hidden moisture sources often lurk behind walls and under floors, remaining undetected without careful investigation.
Start by inspecting areas where plumbing runs, since hidden leaks can occur at joints or fittings. Pay special attention to ceilings beneath bathrooms or kitchens, as these spots are prone to unnoticed water issues.
Next, evaluate your home’s structural vulnerabilities. Cracks in walls or foundations can allow moisture intrusion, leading to long-term damage if ignored.
Use your senses; look for discoloration or feel for dampness along baseboards and in corners.
Don’t forget to check appliances like washing machines and dishwashers, as they can be sources of hidden leaks too.
If you suspect a problem but can’t find the source, a thorough investigation is crucial to prevent further damage and ensure your home remains a safe, welcoming space for you and your loved ones.
Utilizing Moisture Meters for Accurate Readings
To ensure accurate assessments of moisture levels, it’s essential to choose the right type of moisture meter based on your specific needs.
You’ll need to take into account calibration and accuracy standards for reliable readings, as even slight deviations can mislead your evaluation.
Understanding how to interpret these moisture readings will enhance your inspection process and guide you in addressing any underlying issues effectively.
Types of Moisture Meters
Moisture meters are essential tools for accurately evaluating water damage, as they provide reliable readings that help identify hidden moisture within various materials.
You’ll encounter two main types: digital moisture meters and analog moisture meters. Digital moisture meters offer precise, easy-to-read digital displays, often featuring advanced functions like memory storage and data logging. These are particularly useful if you need to track moisture levels over time.
On the other hand, analog moisture meters use a needle gauge to indicate moisture content, giving a more hands-on approach that’s straightforward for immediate readings.
Each type has its advantages, so consider your specific needs and preferences when choosing the right moisture meter for your inspection tasks.
Calibration and Accuracy Standards
Proper calibration and adherence to accuracy standards are essential for ensuring that moisture meters deliver reliable readings during inspections.
Start by familiarizing yourself with various calibration methods specific to your meter type. Regularly calibrating your moisture meter ensures that it measures moisture content accurately, reflecting the true conditions of the affected area.
Implement accuracy verification procedures, such as using reference materials with known moisture levels to validate your readings. This step is vital to build confidence in your results, making your inspections more credible.
By prioritizing these calibration practices, you enhance the reliability of your inspections and contribute to a culture of excellence within your team.
Interpreting Moisture Readings
Understanding moisture readings is essential for evaluating water damage accurately, especially when you’re relying on moisture meters. By mastering effective reading techniques, you can identify moisture patterns that reveal hidden issues.
- You’ll gain confidence knowing you’re making informed decisions.
- Your efforts can save a home from future complications.
- You’ll feel connected to a community dedicated to restoration and care.
Start by calibrating your meter before use, ensuring accuracy. Focus on areas with visible damage, and take multiple readings to establish patterns.
Compare readings against baseline moisture levels in unaffected areas. This systematic approach helps you differentiate between normal and excessive moisture, guiding your remediation efforts effectively.
Embrace these techniques, and you’ll foster a deeper understanding of water damage inspection.
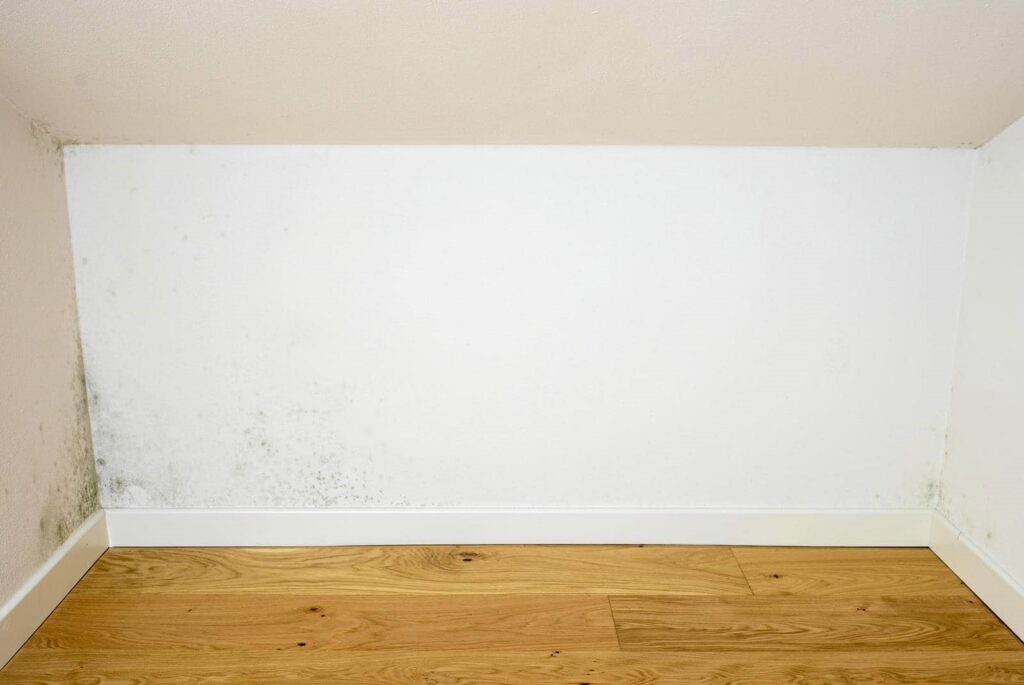
Visual Inspection Techniques for Mold Growth
When inspecting for mold growth, you should start by identifying moisture hotspots, as these areas are often conducive to mold development.
Pay close attention to any discoloration on walls or ceilings, which can indicate hidden mold behind surfaces.
Systematically checking these signs will help you assess the extent of the problem effectively.
Identify Moisture Hotspots
To effectively identify moisture hotspots that can lead to mold growth, you need to conduct a thorough visual inspection of your space.
Start by utilizing moisture mapping techniques and thermal imaging tools to pinpoint areas with elevated moisture levels. Look closely at corners, behind appliances, and around windows where water often accumulates.
- Feel secure in your home’s environment.
- Protect your loved ones from health risks.
- Maintain the beauty and integrity of your space.
Pay attention to any signs of water intrusion, as these could be early indicators of mold growth.
Look for Discoloration
Discoloration on walls, ceilings, and other surfaces often signals potential mold growth, so you should be vigilant during your visual inspection.
Start by noting any color changes, such as yellow, brown, or green patches that may appear. These changes can indicate moisture retention and mold presence.
Pay close attention to the surface texture, as mold often creates a fuzzy or slimy feel. Don’t forget to check corners and hidden areas where water might’ve pooled.
If you observe any unusual discoloration or changes in texture, it’s essential to address the issue promptly.
Implementing Air Quality Testing
How do you ensure the air quality in a space affected by water damage is safe for occupancy? Implementing air quality testing is vital.
You’ll need to follow established testing protocols to identify airborne contaminants that may compromise your health and safety. Start by collecting air samples from different areas, especially near damp spots, to ensure thorough analysis.
- You deserve a safe environment for your loved ones.
- Breathing easy should never be a luxury.
- Your well-being matters—don’t settle for less.
After testing, compare results to industry standards. If contaminants exceed safe levels, take immediate action to remediate the problem.
This systematic approach protects your health and fosters a sense of belonging in your home. Remember, a safe space is fundamental for peace of mind, and you have the right to ensure it.
Documenting Findings for Insurance Claims
While maneuvering through the aftermath of water damage, documenting your findings meticulously is essential for a successful insurance claim. Start by taking detailed notes on the affected areas, noting the extent of the damage and any visible mold or structural issues.
Capture high-quality photographs that clearly show the damage, including close-ups and wide shots for context.
Organize your claim documentation by creating a list of all damaged items, including their estimated value and replacement costs. Keep receipts for any repairs or temporary measures you take, as these will support your insurance processes.
Additionally, maintain a timeline of events, documenting when the damage occurred and when you reported it to your insurance company. This systematic approach helps you stay organized and strengthens your position during the claims process, ensuring you have the necessary evidence to support your case.
Engaging Professional Inspectors and Remediators
As you navigate the complexities of water damage, engaging professional inspectors and remediators can be essential for ensuring a thorough assessment and effective restoration.
When choosing these experts, focus on their inspector qualifications and adherence to established remediation protocols. This will help you avoid costly errors and ensure your home is safe.
Consider these emotional aspects when making your decision:
Peace of mind: Knowing a qualified professional is handling your situation.
Community support: Relying on trusted experts fosters a sense of belonging.
Empowerment: Gaining knowledge from professionals empowers you to make informed decisions.
Developing a Comprehensive Recovery Plan
To effectively recover from water damage, you must develop a thorough recovery plan that addresses both immediate needs and long-term solutions. Start with a detailed risk assessment to identify vulnerable areas and potential hazards. This assessment guides your decisions and ensures you prioritize effectively.
Next, create a recovery timeline that outlines key milestones and goals. Break down the recovery process into manageable steps, such as drying out affected areas, removing damaged materials, and restoring utilities. Assign specific tasks to responsible individuals or professionals to promote accountability.
Regularly review and adjust your plan as needed, based on the progress and any unforeseen challenges. Communicate openly with all stakeholders to foster a sense of unity and shared purpose.
Frequently Asked Questions
How Long Does It Take for Water Damage to Show Signs of Mold?
Mold growth can start within 24 to 48 hours after water exposure. You should use moisture detection techniques to monitor damp areas, preventing mold from developing and ensuring a safe, healthy environment for everyone involved.
Can I Perform a Water Damage Inspection Without Professional Help?
Yes, you can perform a DIY inspection for water damage. Start by checking walls, ceilings, and floors for discoloration, dampness, or unusual smells. Document your findings systematically to ensure thoroughness and clarity in your assessment.
What Are the Health Risks Associated With Water Damage?
When water lingers, it’s like a silent thief—mold growth creeps in, stealing health, while the structure weakens. You risk respiratory issues and compromised safety, so stay vigilant and act swiftly against hidden dangers.
How Often Should I Inspect My Property for Water Damage?
You should inspect your property for water damage quarterly. Use a detailed inspection checklist to identify leaks or moisture issues. Following these frequency guidelines helps maintain a safe environment and fosters a sense of community responsibility.
What Should I Do Immediately After Discovering Water Damage?
Immediately address water damage by turning off utilities and removing excess water. Then, conduct a thorough damage assessment to identify affected areas. Document findings for insurance claims and seek professional help to prevent further issues.
Final Thoughts
Conducting a thorough post-water damage inspection is like assembling a puzzle; each piece contributes to a clear picture of the damage. By systematically evaluating water impact, identifying hidden moisture, and employing advanced tools like moisture meters and thermal imaging, you can uncover the full extent of the problem. Engaging professionals for air quality testing and documenting your findings will ensure a comprehensive recovery plan that safeguards your home and effectively supports your insurance claims.
Recent Posts
Why Use Advanced Mold Inspection Methods After Water Damage?
After water damage, the risk of mold growth escalates quickly. You may not realize that
What Are Top Tips for Water Damage Cleanup?
When faced with water damage cleanup, it is vital to act quickly and methodically. Start
Essential Tips for Emergency Water Damage Cleanup
When faced with water damage, quick water damage cleanup action is essential to minimize the