Contents
When faced with water damage cleanup, it is vital to act quickly and methodically. Start by evaluating the extent of the damage, identifying the water source and type. Safety is paramount; make sure electricity is turned off and wear protective gear. Next, remove standing water promptly to prevent further issues. However, the cleanup doesn’t end there—understanding the best drying and cleaning practices is necessary. What steps should you take next to ensure thorough restoration?
Key Takeaways
- Assess the extent of water damage by identifying the water type and documenting affected areas with detailed photographs for insurance claims.
- Ensure safety by turning off electricity, wearing protective gear, and checking structural integrity before entering damaged areas.
- Remove standing water promptly using pumps or wet/dry vacuums, and check for hidden moisture pockets in carpets or furniture.
- Thoroughly dry out affected areas by enhancing airflow, using fans, and monitoring humidity levels to prevent mold growth.
- Clean and disinfect surfaces with appropriate solutions, prioritize salvaging valuable items, and consult professionals for extensive damage or hidden issues.
Assess the Extent of Water Damage
Before you plunge into cleanup, it’s essential to assess the extent of water damage to determine the best course of action. Start by identifying the water types involved—clean, grey, or black water—since each poses different risks and cleanup protocols. Clean water from a broken pipe is less hazardous than grey water from a washing machine, and black water from sewage requires special handling.
Next, pinpoint damage sources; understand whether the leak originated from plumbing issues, roof leaks, or flooding. Inspect areas like walls, floors, and ceilings carefully, looking for discoloration, warping, or mold growth. Use moisture meters to quantify dampness, as some damage may be hidden.
Document your findings with photos for insurance claims and to track the situation’s progression. This thorough assessment informs your cleanup strategy and fosters a sense of community as you’re prepared to tackle the challenge together with others facing similar situations.
Ensure Safety First
Once you’ve assessed the extent of the water damage, prioritizing safety is your next step.
Start by turning off the electricity in affected areas to prevent electrocution hazards. Wear personal protective equipment (PPE) like gloves, masks, and rubber boots to shield yourself from contaminants and harmful substances.
Ensure proper ventilation; open windows and doors to allow fresh air circulation while reducing mold growth risks. Be cautious of structural integrity—check for sagging ceilings or unstable floors that could pose a danger.
Avoid contact with floodwater, as it may contain bacteria or chemicals. Also, keep children and pets away from the affected areas to minimize their risk.
By adhering to these safety precautions, you create a safer environment for yourself and anyone involved, fostering a sense of community and care during this challenging time.
Remove Standing Water Quickly
As you tackle water damage, removing standing water quickly is essential to prevent further issues like mold growth and structural damage.
Swift water removal protects your property and enhances flood prevention efforts for the future.
Here’s how you can effectively manage the situation:
- Use a submersible pump for large amounts of water.
- Employ wet/dry vacuums for smaller pools.
- Mop up excess water using absorbent materials.
- Check for hidden pockets of water in carpets or under furniture.
- Ensure proper drainage in and around your property.
Dry Out Affected Areas
To effectively dry out affected areas after water damage, you should focus on several key steps that promote rapid moisture removal.
Begin by identifying all damp surfaces, including walls, floors, and furniture. Use appropriate drying techniques, such as blotting or sweeping excess water from surfaces. For porous materials like carpets or upholstery, use a wet vacuum to extract moisture thoroughly.
Next, ensure proper airflow by opening windows and doors to facilitate natural ventilation. Assess the need to remove baseboards or drywall, as trapped moisture can lead to mold growth.
Regularly monitor humidity levels to maintain effective moisture control, aiming for a relative humidity below 60%.
Lastly, consider using fans or other ventilation methods to enhance air circulation and accelerate the drying process. This methodical approach will help you reclaim your space efficiently and prevent further damage.
Use Dehumidifiers and Fans
To effectively reduce moisture levels, position dehumidifiers in the most water-damaged areas, ensuring they’re not obstructed by furniture or walls.
Use fans to enhance airflow, directing them toward the wet surfaces to expedite evaporation.
Monitor the drying duration closely, aiming for at least 24 to 48 hours for ideal results.
Optimal Equipment Placement
When tackling water damage cleanup, strategically placing dehumidifiers and fans can greatly enhance the drying process.
Proper equipment positioning is essential for creating ideal airflow, ensuring moisture is effectively removed from your space.
Here’s how to position your equipment for maximum efficiency:
Place dehumidifiers in the center of the affected area to draw moisture from all directions.
Position fans to blow air directly toward damp surfaces, accelerating evaporation.
Ascertain fans are elevated to promote better air circulation.
Avoid blocking airflow by keeping furniture and obstacles away from equipment.
Utilize multiple fans to create cross-ventilation, enhancing overall drying speed.
Ideal Drying Duration
Determining the ideal drying duration after water damage involves several factors, including the extent of the moisture and the efficiency of your dehumidifiers and fans.
To achieve optimal results, you should utilize ideal drying techniques tailored to your specific situation. Typically, drying timeframes can range from 24 to 72 hours, depending on the severity of the water damage.
Begin by placing dehumidifiers in the most affected areas, ensuring they run continuously. Pair them with fans to enhance airflow, promoting faster evaporation.
Make sure to monitor humidity levels regularly; the goal is to reach below 60% relative humidity for effective drying.
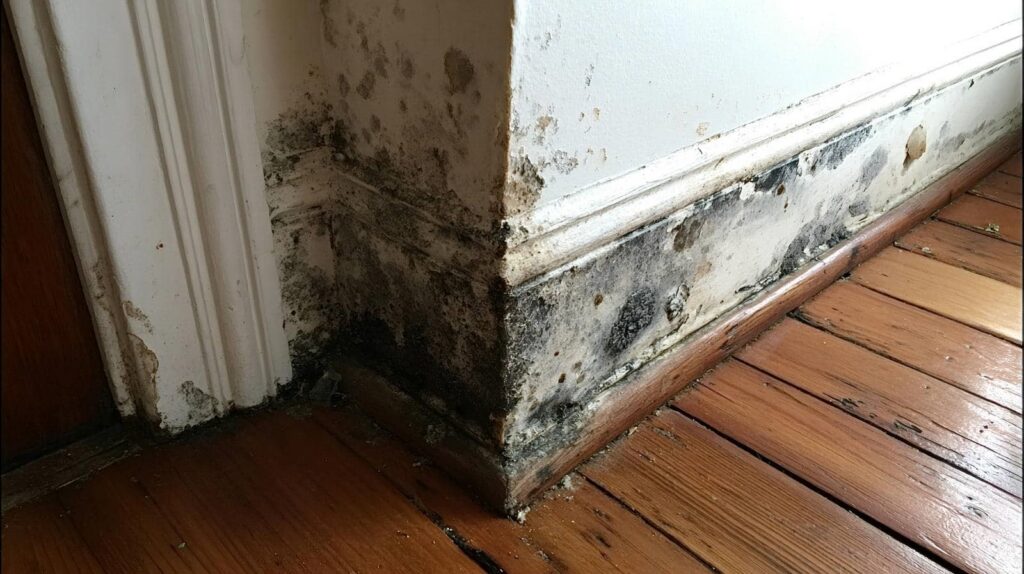
Inspect for Mold Growth
Although water damage can be addressed promptly, mold growth can quickly become a serious issue if left unchecked.
You must inspect your property thoroughly to prevent mold from taking hold. This is essential for your health and safety, as mold can pose significant health risks.
Here’s what to look for:
- Dark spots on walls or ceilings
- Musty odors in enclosed spaces
- Dampness in corners or under carpets
- Visible mold on furniture or personal items
- Condensation on windows or pipes
Clean and Disinfect Surfaces
To effectively clean and disinfect surfaces after water damage, you’ll need essential supplies such as gloves, masks, sponges, and appropriate cleaning agents.
Utilize effective disinfection methods, like using a mixture of bleach and water, to ensure you eliminate harmful pathogens.
Following these steps methodically will help restore your space to a safe and healthy condition.
Essential Cleaning Supplies
When tackling water damage cleanup, having the right cleaning supplies is essential for effectively disinfecting surfaces.
Equipping yourself with proper cleaning equipment and safety gear ensures both efficiency and safety during the process.
Here’s a quick list of must-have supplies:
- Heavy-duty gloves: Protect your hands from contaminants.
- N95 respirator mask: Safeguard your lungs from mold spores and harmful chemicals.
- Microfiber cloths: Use these for effective wiping and absorbing moisture.
- Disinfectant solution: Choose EPA-approved products to eliminate bacteria and viruses.
- Bucket and mop: Essential for managing excess water and ensuring thorough cleaning.
With these supplies at hand, you’ll be better prepared to tackle the challenges of water damage cleanup.
Effective Disinfection Methods
Effective disinfection methods are essential for ensuring that surfaces are free from harmful pathogens after water damage.
Start by selecting appropriate sanitation products, such as EPA-approved disinfectants, that are effective against mold and bacteria.
Utilize thorough disinfection techniques, including spraying or wiping down surfaces with your chosen disinfectant. Allow the product to sit for the recommended dwell time to maximize its effectiveness.
Pay special attention to high-touch areas like doorknobs, light switches, and countertops.
After disinfecting, rinse surfaces with clean water if required, and ensure they’re completely dry to prevent mold growth.
Salvage Valuable Items
Salvaging valuable items from water damage requires a systematic approach to minimize loss and ensure safety.
Start by prioritizing items based on their sentimental and monetary value. Use effective salvage techniques to assess and restore them.
Photographs and Documents: Freeze them immediately to prevent further damage.
Electronics: Disconnect and dry them thoroughly, consulting professionals if necessary.
Furniture: Remove excess water and apply drying agents to prevent warping.
Artwork: Carefully remove from walls, and air-dry or consult an art restoration expert.
Jewelry and Heirlooms: Clean with a gentle solution and make certain they’re dried properly to prevent tarnishing.
Document the Damage
To effectively document the damage, start by taking detailed photographs of affected areas and items from multiple angles.
Next, create a thorough inventory of all damaged items, noting their condition and any necessary repairs.
This meticulous approach will provide you with essential evidence for insurance claims and future reference.
Take Detailed Photographs
Capturing detailed photographs of the water damage is essential for both documentation and insurance claims. These images serve as vital photographic evidence during your damage assessment process.
To ensure you capture the extent of the damage accurately, follow these tips:
- Focus on the most affected areas, like ceilings and walls.
- Include close-ups of water stains, mold, or structural damage.
- Take wide shots to show the overall context of the affected space.
- Document any items impacted by the water, such as furniture or electronics.
- Use a timestamp feature on your camera for accurate records.
Record Damaged Items
Documenting damaged items is an essential step in the water damage cleanup process, as it helps ensure you’re fully aware of what needs to be addressed.
Start by creating an inventory checklist that lists each affected item, including furniture, electronics, and personal belongings. For each entry, conduct a thorough item evaluation; note the extent of the damage and any necessary repairs.
Don’t forget to take clear photographs to supplement your written documentation. This detailed record aids in the cleanup process and serves as critical evidence for insurance claims.
Note Affected Areas
While you focus on evaluating the damage within your space, it’s essential to note all affected areas systematically.
This damage assessment will help you prioritize your cleanup efforts and ensure nothing gets overlooked.
Here are key areas you should document:
- Walls: Check for water stains or warping.
- Floors: Identify any buckling or discoloration in wood or carpet.
- Furniture: Look for damage to upholstery or wood finishes.
- Electrical Outlets: Inspect for corrosion or moisture exposure.
- HVAC Systems: Confirm there’s no moisture in ducts or units.
Consult Professionals for Restoration
When water damage strikes, you can’t underestimate the importance of consulting professionals for restoration. These experts provide essential restoration services that can save your property from further deterioration.
A thorough professional assessment identifies underlying issues that you might overlook, such as hidden mold or structural weaknesses. Their specialized training equips them with the right tools and techniques to handle the situation effectively.
They can assess the extent of the damage, remove excess water, and dry affected areas quickly, preventing long-term consequences. Additionally, professionals understand local regulations and can ensure compliance during the restoration process.
Frequently Asked Questions
How Long Does Water Damage Cleanup Typically Take?
Water damage cleanup typically takes several days to weeks, depending on the water damage timeline and restoration factors like the extent of damage, affected materials, and drying time. You’ll need patience during this process.
Can I Handle Water Damage Cleanup Myself?
You can tackle water damage cleanup yourself, like a brave knight facing a dragon. Employ water extraction methods and DIY restoration techniques, but remember, thoroughness and safety are your best allies in this quest.
What Are the Costs Associated With Water Damage Restoration?
Water damage costs vary greatly based on damage severity and restoration expenses. You’ll need to contemplate factors like water extraction, drying, and repairs. A professional assessment will help you understand the overall financial implications more accurately.
How Can I Prevent Future Water Damage?
Preventing future water damage is like fortifying a castle. Use waterproofing techniques for basements and roofs, and prioritize regular plumbing maintenance to catch leaks early. Stay vigilant, and your home will remain safe and dry.
Will Homeowners Insurance Cover Water Damage Costs?
Yes, homeowners insurance often covers water damage, but it depends on your policy’s insurance types and coverage limits. Review your plan carefully to understand what’s included, ensuring you’re protected against potential future incidents effectively.
Review
In the aftermath of water damage, remember that swift action is your best ally, much like a hero racing against time in a story. By evaluating the damage, ensuring safety, and removing water quickly, you can prevent further chaos. As you dry, clean, and document everything, think of yourself as the architect of your recovery. If the situation feels overwhelming, don’t hesitate to call in the professionals—sometimes, even heroes need a sidekick to tackle the toughest challenges.
Recent Posts
Immediate Water Damage Restoration: Your Essential Guide
Water Damage Restoration requires a fast and structured response to protect your property and prevent
Why Implement Strategies for Water Damage Protection?
Implementing strategies for water damage protection is essential for safeguarding your property and ensuring safety.
Top Strategies for Commercial Water Damage Prevention
Preventing commercial water damage requires vigilance, proactive measures, and strategic planning. Regular inspections and maintenance,